
Overview
What you'll learn: How to monitor multiple SharePoint lists across multiple sites using just two flows instead of dozens.
Time required: 60-90 minutes
Prerequisites:
- Power Automate Premium license OR Azure Logic Apps access
- SharePoint site collection administrator permissions
- A SharePoint site for storing configuration lists
What you'll build:
- Two SharePoint lists for configuration
- One flow to manage webhook subscriptions
- One flow to handle change notifications
The Problem
If you need to monitor 50 SharePoint lists for changes, the obvious approach requires 50 separate flows. This creates a management nightmare with 50 flows to maintain and update.
The solution: Use SharePoint webhooks. Instead of 50 flows, you need exactly two:
- Subscription Flow – Creates and renews webhook subscriptions (runs monthly)
- Handler Flow – Receives notifications and processes changes (triggered automatically)
Architecture Overview
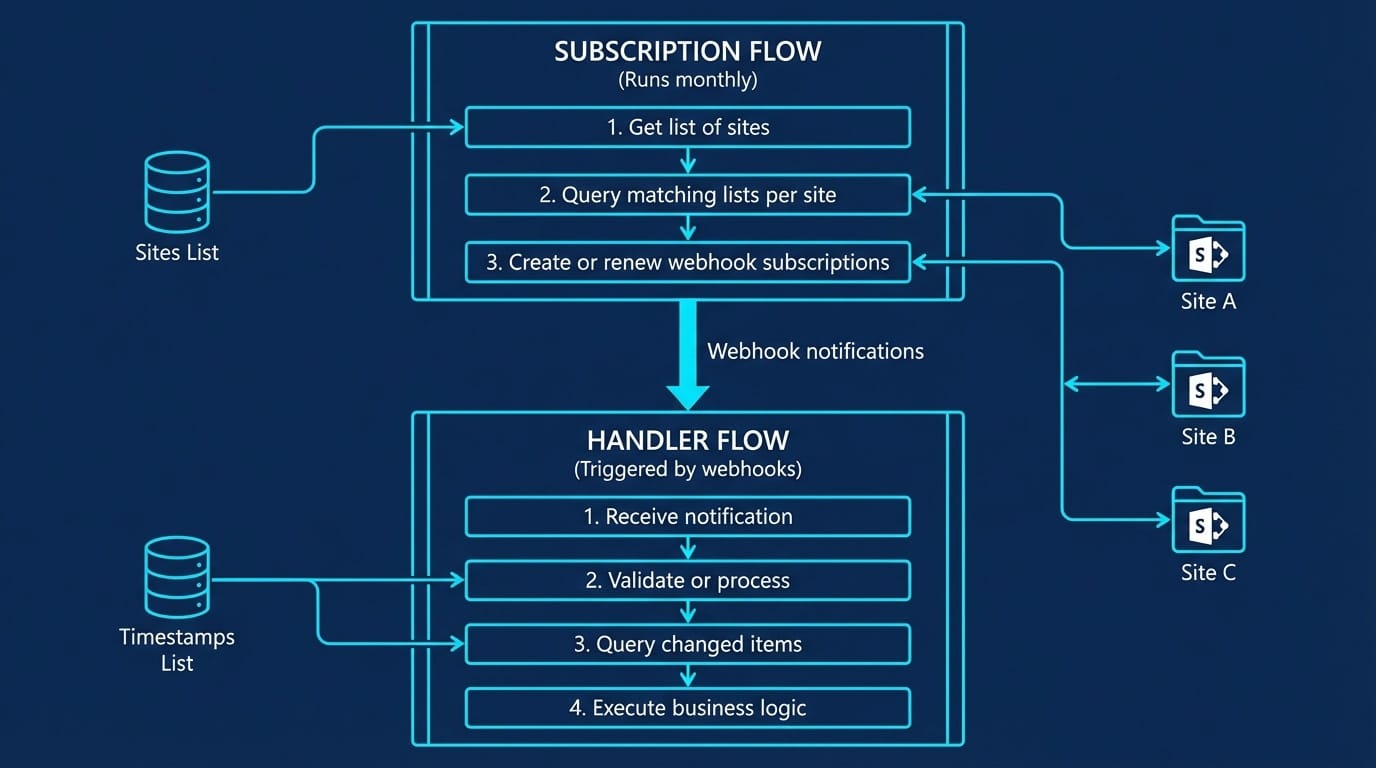
The Subscription Flow runs once per month. It loops through all your sites, finds lists matching your criteria, and creates webhook subscriptions pointing to the Handler Flow.
When something changes on any monitored list, SharePoint sends a notification to the Handler Flow. The Handler Flow then queries the list to find what changed and executes your business logic.
Licensing Note
This solution requires Power Automate Premium because the Handler Flow uses the "When a HTTP request is received" trigger (a premium connector).
Alternative: Use Azure Logic Apps with consumption-based pricing. This is often more cost-effective for low-volume scenarios and doesn't require a premium license.
The instructions below work for both Power Automate and Logic Apps.
Part 1: Create the Configuration Lists
Before building the flows, you need two SharePoint lists to store configuration data.
Step 1.1: Create the Sites List
This list stores the SharePoint sites you want to monitor.
Step 1.1.1: Navigate to Your Management Site
- Open your browser and go to the SharePoint site where you want to store the configuration
- This could be any site, for example:
https://yourtenant.sharepoint.com/sites/management
Step 1.1.2: Create a New List
- Click + New in the top left
- Click List
- Select Blank list
- Enter the name:
Sites - Click Create
Step 1.1.3: Add the URL Column
The list already has a Title column. You need to add one more column.
- Click + Add column
- Select Single line of text
- Enter the name:
URL - Click Save
Step 1.1.4: Add Your Sites
Add one row for each site you want to monitor. For example, your first entry might have the Title Sales Site with the URL https://yourtenant.sharepoint.com/sites/sales. Add additional rows for each site, such as HR Site pointing to https://yourtenant.sharepoint.com/sites/hr and Projects Site pointing to https://yourtenant.sharepoint.com/sites/projects.
Step 1.2: Create the Timestamps List
This list tracks when each monitored list was last processed.
Step 1.2.1: Create the List
- Click + New in the top left
- Click List
- Select Blank list
- Enter the name:
Timestamps - Click Create
Step 1.2.2: Add the Required Columns
Add three columns:
Column 1: listGUID
- Click + Add column
- Select Single line of text
- Enter the name:
listGUID - Click Save
Column 2: SiteURL
- Click + Add column
- Select Single line of text
- Enter the name:
SiteURL - Click Save
Column 3: LastModificationDateTime
- Click + Add column
- Select Date and time
- Enter the name:
LastModificationDateTime - Click Save
You'll populate this list later when the Subscription Flow runs.
Part 2: Create the Handler Flow
You must create the Handler Flow first because you need its URL for the Subscription Flow.
Step 2.1: Create a New Flow
Step 2.1.1: Open Power Automate
- Go to https://make.powerautomate.com
- Sign in with your Microsoft 365 account
Step 2.1.2: Create the Flow
- Click + Create in the left menu
- Click Instant cloud flow
- Enter the flow name:
Webhook Handler - Scroll down and select When a HTTP request is received
- Click Create
Step 2.2: Configure the HTTP Trigger
Step 2.2.1: Get the HTTP URL
After creating the flow, you'll see the trigger action open.
- Leave Request Body JSON Schema empty for now
- Click Save in the top right
- After saving, the HTTP POST URL field will show a long URL
- Click the copy icon next to the URL
- Save this URL somewhere – you'll need it for the Subscription Flow
The URL looks like this:
https://prod-XX.westeurope.logic.azure.com:443/workflows/abc123.../triggers/manual/paths/invoke?api-version=...Step 2.3: Add the Response Action
SharePoint expects a response within 5 seconds. You must respond immediately.
Step 2.3.1: Add the Response
- Click + New step
- Search for
Response - Select Response (under "Request")
- Set Status Code to:
200 - Leave Body empty
Step 2.4: Add Variables
You need to initialize variables to store data during processing.
Step 2.4.1: Add Variable for Headers
- Click + New step
- Search for
Initialize variable - Select Initialize variable
- Configure:
- Name:
header_nometa - Type: Select Object
- Value:
Step 2.4.2: Add Variable for List GUID
- Click + New step
- Search for
Initialize variable - Select Initialize variable
- Configure:
- Name:
ListGUID - Type: Select String
- Value: Leave empty
Step 2.4.3: Add Variable for Site URL
- Click + New step
- Search for
Initialize variable - Select Initialize variable
- Configure:
- Name:
listSiteURL - Type: Select String
- Value: Leave empty
Step 2.4.4: Add Variable for Timestamp
- Click + New step
- Search for
Initialize variable - Select Initialize variable
- Configure:
- Name:
lastModifiedTime - Type: Select String
- Value: Leave empty
Step 2.5: Handle Validation Requests
When creating a subscription, SharePoint sends a validation request first. You must detect and handle this.
Step 2.5.1: Add a Condition
- Click + New step
- Search for
Condition - Select Condition (under "Control")
Step 2.5.2: Configure the Condition
In the condition, you'll check if the Content-Length header is 0 (meaning it's a validation request).
- In the first field (left side), click in the box
- Click Expression tab
- Enter:
int(triggerOutputs()?['headers']?['Content-Length']) - Click OK
- In the middle dropdown, select is equal to
- In the right field, enter:
0
Step 2.6: Configure the "If Yes" Branch (Validation)
When Content-Length is 0, it's a validation request. You must return the validation token.
Step 2.6.1: Add Response in "If Yes"
- Click inside the If yes branch
- Click Add an action
- Search for
Response - Select Response
- Configure:
- Status Code:
200 - Click Show advanced options
- Under Headers, click + Add new item
- Key:
Content-Type - Value:
text/plain - Body: Click in the box, then click Expression and enter:
- Click OK
Step 2.6.2: Add Terminate Action
- Click Add an action (still in "If yes" branch)
- Search for
Terminate - Select Terminate (under "Control")
- Set Status to: Succeeded
Step 2.7: Configure the "If No" Branch (Change Notification)
When Content-Length is not 0, it's an actual change notification.
Step 2.7.1: Set the ListGUID Variable
- Click inside the If no branch
- Click Add an action
- Search for
Set variable - Select Set variable
- Configure:
- Name: Select
ListGUID - Value: Click Expression and enter:
- Click OK
Step 2.7.2: Set the listSiteURL Variable
- Click Add an action
- Search for
Set variable - Select Set variable
- Configure:
- Name: Select
listSiteURL - Value: Click Expression and enter:
- Click OK
- Important: Replace
yourtenantwith your actual tenant name
Step 2.7.3: Get the Last Processed Timestamp
- Click Add an action
- Search for
Send an HTTP request to SharePoint - Select Send an HTTP request to SharePoint
- Configure:
- Site Address: Enter your management site URL (e.g.,
https://yourtenant.sharepoint.com/sites/management) - Method: Select GET
- Uri:
- Headers: Click + Add new item
- Key:
Accept - Value:
application/json; odata=nometadata
Step 2.7.4: Set the lastModifiedTime Variable
- Click Add an action
- Search for
Set variable - Select Set variable
- Configure:
- Name: Select
lastModifiedTime - Value: Click Expression and enter:
- Click OK
Step 2.7.5: Update the Timestamp
Update the timestamp before processing to prevent duplicate processing.
- Click Add an action
- Search for
Send an HTTP request to SharePoint - Select Send an HTTP request to SharePoint
- Configure:
- Site Address: Your management site URL
- Method: Select POST
- Uri: Click Expression and enter:
- Headers: Click Switch to text mode (if available) or add these items:
Accept:application/json;odata=nometadataContent-Type:application/json;odata=nometadataIF-MATCH:*X-HTTP-Method:MERGE- Body:
Step 2.7.6: Get Modified Items
- Click Add an action
- Search for
Get items - Select Get items (SharePoint)
- Configure:
- Site Address: Click in the box, then select Enter custom value, then select
listSiteURLfrom Dynamic content - List Name: Click in the box, then select Enter custom value, then select
ListGUIDfrom Dynamic content - Click Show advanced options
- Filter Query:
Step 2.7.7: Process Each Modified Item
- Click Add an action
- Search for
Apply to each - Select Apply to each (under "Control")
- In Select an output from previous steps, select
valuefrom the "Get items" action
Inside this loop, add your business logic (send emails, update records, etc.).
Step 2.8: Save the Flow
- Click Save in the top right corner
- Verify the flow saves without errors
Part 3: Create the Subscription Flow
This flow creates and renews webhook subscriptions for all your lists.
Step 3.1: Create a New Flow
Step 3.1.1: Create the Flow
- In Power Automate, click + Create
- Click Scheduled cloud flow
- Configure:
- Flow name:
Webhook Subscription Manager - Starting: Select today's date
- Repeat every:
1Month - Click Create
Step 3.2: Initialize Variables
You need several variables for this flow.
Step 3.2.1: Add Variable for Headers
- Click + New step
- Search for
Initialize variable - Select Initialize variable
- Configure:
- Name:
header_nometa - Type: Select Object
- Value:
Step 3.2.2: Add Variable for Flow Name
- Click + New step
- Search for
Initialize variable - Select Initialize variable
- Configure:
- Name:
flowName - Type: Select String
- Value: Click Expression and enter:
- Click OK
Step 3.2.3: Add Variable for Notification URL
- Click + New step
- Search for
Initialize variable - Select Initialize variable
- Configure:
- Name:
notificationURL - Type: Select String
- Value: Paste the HTTP POST URL you copied from the Handler Flow
Step 3.2.4: Add Variable for Expiration Date
- Click + New step
- Search for
Initialize variable - Select Initialize variable
- Configure:
- Name:
expirationDateTime - Type: Select String
- Value: Click Expression and enter:
- Click OK
Step 3.2.5: Add Variable for Subscription ID
- Click + New step
- Search for
Initialize variable - Select Initialize variable
- Configure:
- Name:
SubscriptionID - Type: Select String
- Value: Leave empty
Step 3.3: Get the Sites to Monitor
Step 3.3.1: Get Items from Sites List
- Click + New step
- Search for
Get items - Select Get items (SharePoint)
- Configure:
- Site Address: Your management site URL
- List Name: Select
Sites
Step 3.4: Loop Through Each Site
Step 3.4.1: Add Apply to Each
- Click + New step
- Search for
Apply to each - Select Apply to each
- In Select an output from previous steps, select
valuefrom "Get items"
Step 3.5: Get Lists from Each Site
Inside the "Apply to each" loop:
Step 3.5.1: Query Lists Matching Your Criteria
- Click Add an action
- Search for
Send an HTTP request to SharePoint - Select Send an HTTP request to SharePoint
- Configure:
- Site Address: Click in the box, click Dynamic content, select
URLfrom the Sites list - Method: Select GET
- Uri:
- Headers:
- Key:
Accept - Value:
application/json; odata=nometadata
Customize the filter: Change startswith(Title, 'contracts-') to match your list naming pattern.
Step 3.6: Extract List IDs
Step 3.6.1: Add Select Action
- Click Add an action
- Search for
Select - Select Select (under "Data Operations")
- Configure:
- From: Click Expression and enter:
- Click OK
- Click Switch to text mode (the icon with a "T")
- Map: Click Expression and enter:
- Click OK
Step 3.7: Build Subscription URIs
Step 3.7.1: Add Another Select Action
- Click Add an action
- Search for
Select - Select Select
- Configure:
- From: Select
Outputfrom the previous Select action - Click Switch to text mode
- Map: Enter exactly (including quotes):
Note: If Power Automate removes the quotes when you save, add them back manually.
Step 3.8: Loop Through Each Subscription URI
Step 3.8.1: Add Nested Apply to Each
- Click Add an action
- Search for
Apply to each - Select Apply to each
- In Select an output from previous steps, select
Outputfrom the second Select action
Step 3.9: Check for Existing Subscriptions
Inside the nested loop:
Step 3.9.1: Get Existing Subscriptions
- Click Add an action
- Search for
Send an HTTP request to SharePoint - Select Send an HTTP request to SharePoint
- Configure:
- Site Address: Select
URLfrom Dynamic content (from the Sites list) - Method: Select GET
- Uri: Select
Current itemfrom Dynamic content (this is the subscription URI) - Headers:
- Key:
Accept - Value:
application/json; odata=nometadata
Step 3.9.2: Filter to This Flow's Subscriptions
- Click Add an action
- Search for
Filter array - Select Filter array (under "Data Operations")
- Configure:
- From: Click Expression and enter:
(Note: The action name may have a number like _2 or _3 – check your actual action name)
- Click OK
- In the condition:
- Left field: Click Expression and enter:
item()?['clientState'] - Middle: Select is equal to
- Right field: Select
flowNamevariable
Step 3.9.3: Set the SubscriptionID Variable
- Click Add an action
- Search for
Set variable - Select Set variable
- Configure:
- Name: Select
SubscriptionID - Value: Click Expression and enter:
Step 3.9.4: Extract the List GUID
- Click Add an action
- Search for
Compose - Select Compose (under "Data Operations")
- Rename it to
Get_resource_id(click the three dots, then "Rename") - Inputs: Click Expression and enter:
(Note: Check your actual loop name – it might be Apply_to_each_2 or similar)
Step 3.10: Create or Update the Subscription
Step 3.10.1: Add a Condition
- Click Add an action
- Search for
Condition - Select Condition
- Configure:
- Left field: Click Expression and enter:
length(body('Filter_array')) - Middle: Select is greater than
- Right field: Enter
0
Step 3.11: Configure "If Yes" (Update Existing Subscription)
Step 3.11.1: Update the Subscription
- Click inside If yes
- Click Add an action
- Search for
Send an HTTP request to SharePoint - Select Send an HTTP request to SharePoint
- Configure:
- Site Address: Select
URLfrom the Sites list - Method: Select PATCH
- Uri: Click Expression and enter:
- Headers:
Accept:application/json; odata=nometadataContent-Type:application/json; odata=nometadata- Body:
Step 3.12: Configure "If No" (Create New Subscription)
Step 3.12.1: Create the Subscription
- Click inside If no
- Click Add an action
- Search for
Send an HTTP request to SharePoint - Select Send an HTTP request to SharePoint
- Configure:
- Site Address: Select
URLfrom the Sites list - Method: Select POST
- Uri: Select
Current itemfrom Dynamic content (the subscription URI) - Headers:
Accept:application/json; odata=nometadataContent-Type:application/json; odata=nometadata- Body:
Step 3.13: Save the Flow
- Click Save in the top right corner
- Verify the flow saves without errors
Part 4: Initialize the Timestamps List
Before running the Subscription Flow, you need to add entries to the Timestamps list for each list you want to monitor.
Step 4.1: Get List GUIDs
For each list you want to monitor:
- Navigate to the list in SharePoint
- Click the gear icon (Settings) in the top right
- Click List settings
- Look at the URL in your browser – find the part that says
List=%7B...%7D - The GUID is between
%7Band%7D(these are encoded{and})
Step 4.2: Add Entries to Timestamps List
For each monitored list, add a row with the following values:
- Title: A descriptive name, e.g.
Contracts-Sales - listGUID: The GUID you copied in the previous step, e.g.
abc12345-... - SiteURL: The full URL of the site where the list lives, e.g.
https://yourtenant.sharepoint.com/sites/sales - LastModificationDateTime: Set this to today's date
Repeat for every list you want to monitor. For instance, add a second row for Contracts-HR with its GUID and the HR site URL.
Part 5: Test the Solution
Step 5.1: Test the Handler Flow
- Open the Handler Flow
- Click Test in the top right
- Select Manually
- Click Test
- The flow will wait for a trigger
Step 5.2: Run the Subscription Flow
- Open the Subscription Flow
- Click Test in the top right
- Select Manually
- Click Test
- Click Run flow
If successful, the Subscription Flow will create webhook subscriptions, which will trigger the Handler Flow's validation.
Step 5.3: Verify Subscriptions Were Created
- Check the Subscription Flow run history – all actions should show green checkmarks
- Check the Handler Flow run history – you should see validation runs (these are normal)
Step 5.4: Test a Real Change
- Go to one of your monitored SharePoint lists
- Create or modify an item
- Within a few minutes, the Handler Flow should trigger
- Check the Handler Flow run history to verify it processed the change
Troubleshooting
"Failed to validate notification URL" — This means the Handler Flow is not responding to SharePoint's validation request. Make sure the Handler Flow is saved and enabled before running the Subscription Flow.
Subscription Flow fails on the "Select" action — Power Automate has a known quirk where it strips the quotation marks from the mapping field when you save. Open the action, re-add the quotes manually, and save again.
Handler Flow never triggers after setup — The webhook subscription has likely expired or was not created correctly. Open the Subscription Flow and run it manually to renew all subscriptions.
No items returned in the Handler Flow — Check that the Timestamps list has correct entries for the list in question. If the LastModificationDateTime value is in the future or the listGUID doesn't match, the filter query will return no results.
"Action name not found" errors in expressions — Power Automate auto-generates action names based on the action title, and appends numbers like _2 or _3 when there are duplicates. Open the action that precedes the failing expression and check its actual generated name, then update the expression to match.
